Report
■ Control appearance
■ Description
A control that specifies tag names from the database and displays them as a table.
■ Event
There are no events available for this control.
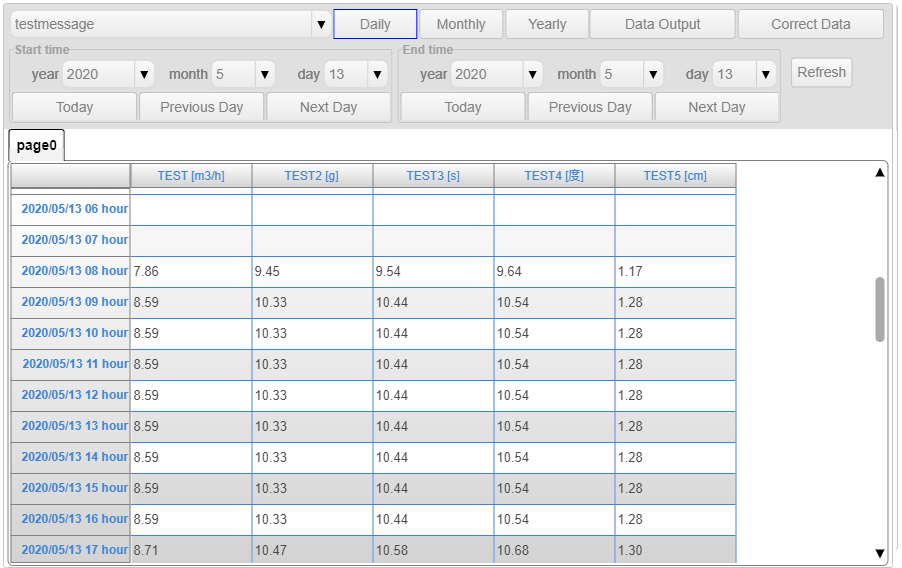
■ Form screen
□ Form selection combo box
You can select the form to be displayed.
□ Form type switching button
You can switch the form to be displayed to daily report, monthly report, and annual report.
□ Data output button
Displays the form output dialog box.
□ Form output dialog box
Output form as Excel file or CSV file. Output options can be set in the advanced properties.
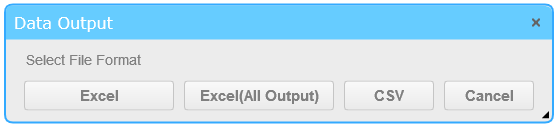
□ Excel button
With the Excel button, the form currently displayed is output as an Excel file according to the date period. This output requires the setting of the template Excel file in the advanced properties.
□ Excel (all output) button
The Excel button (all output) outputs all forms registered in the same type as the currently selected form type according to the currently displayed date period. This output requires the setting of the template Excel file in the advanced properties.
□ CSV button
The CSV button (all output) outputs the form currently displayed as a CSV file according to the date period.
□ Data correction button
Displays a dialog box where you can correct the data. Data correction can only be performed in the daily report state.
□ Start date and time setting area
You can set the start date of the form with the combo box and button.
□ End date and time setting area
You can set the end date of the form with the combo box and the button.
□ Form display area
Displays a table of data from the tag name specified in the detail property to the start date and end date. The data to be displayed is displayed in tabs for each number of display columns that can be set in the advanced property.
■ Detail property
Advanced properties allow you to set the forms to be displayed.
■ Display setting
In Display Settings, you can set the form to be displayed and the CSV file to be output.
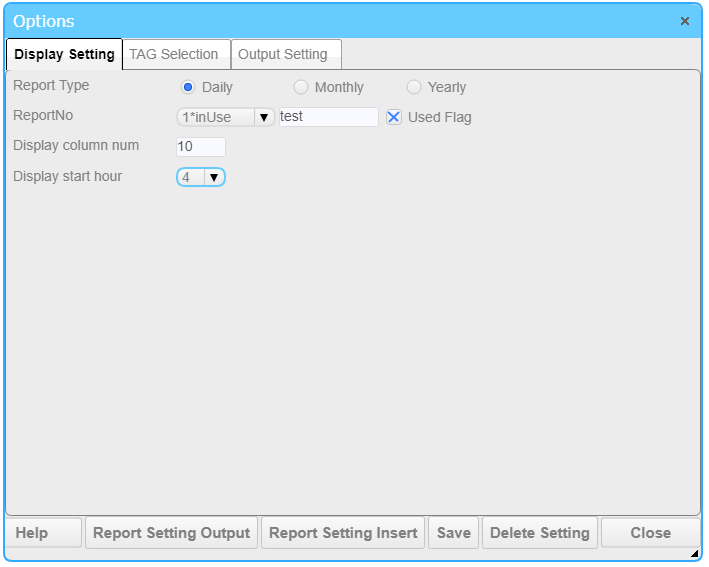
□ Form type
In the form type, specify the type of setting change.
□ Form No
In Form No., specify the form No. whose setting is to be changed.
□ Display column number input area
In the Display column number input area, specify the number of display columns for each tab page displayed in the form display area.
□ Display start hour
Specify hour number of the first line in the daily report.For example, if the display start hour time is 4 o'clock, the data from 4 o'clock on the current day to 3 o'clock on the next day will be the data for the current day.
□ Closing day of the monthly report
Specify the day number as the closing day of the monthly report. For example, if 20 is specified, the data from the 21st of the previous month to the 20th of the current month will be the data for this month.
□ Start month of the year
In the start month of the year, you can set the display start month of the form displayed in the annual report.
■ Tag selection
In Tag selection, set the tag to be displayed in the form area.
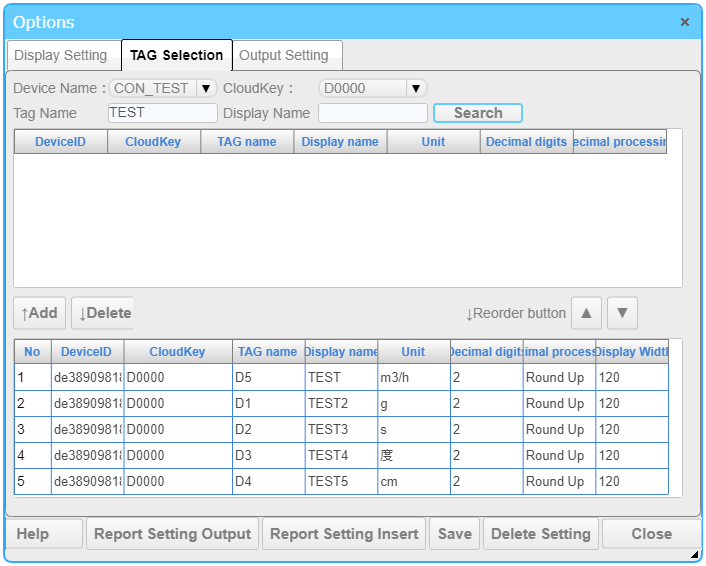
□ Device name selection combo box
In the device name combo box, you can display the cloud key in the cloud key selection combo box by setting the device name
□ Cloud key selection combo box
In the cloud key selection combo box, you can display tags in the tag list display area by selecting the displayed cloud key
□ Tag name search word input area
Tag name search In the word input area, enter a value and press the search button to search for the value entered from the tag name in the tag list display area.
□ Display name search word input area
Display name search In the search word input area, enter a value and press the search button to search for the input value from the display name in the tag name list display area.
□ Tag list display area
Displays the tag name, unit, display name, number of decimal places, and decimal point processing of the value specified in the device name selection combo box and the cloud key selection combo box.
□ Add button
Select any row in the tag list display area table, and press the Add button to add the selected row to the form display target area.
□ Delete button
Select any row in the form display target area table and press the delete button to delete the selected line and add the deleted line to the bottom of the tag list display area table.
□ Selected tags of the report
In the selected tags list, the selected label name, label comments, display name, units, decimal places, decimal point position and display width are listed.
Units, decimal places, decimal point position and display width can be set for each table by selecting the column.
■ Output setting
In Output setting, You can set up the Excel file or CSV file to be output by the Report Output button.
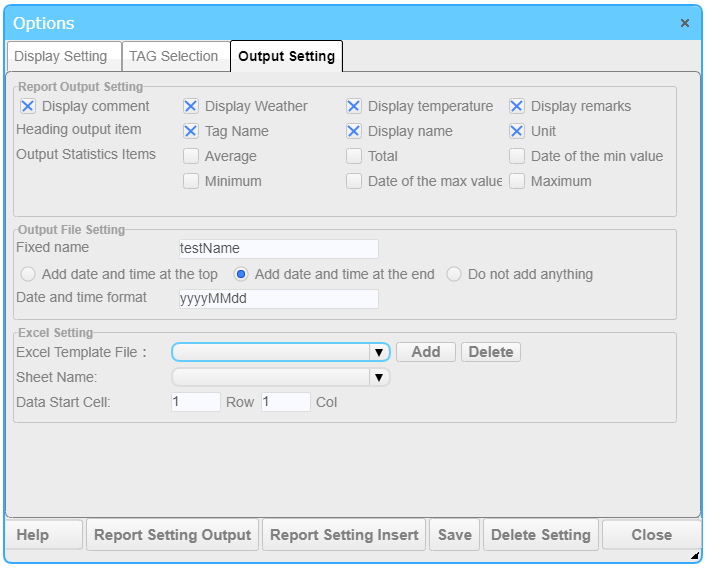
■ Report OutputSetting
□ Comment display check box
In the Comment display check box, set whether to display comments in the file output by the form output button. Comments can be entered in the data correction dialog box.
□ Weather display check box
In the weather display check box, set whether to display the weather in the file output by the form output button. The weather can be entered in the data correction dialog box.
□ Temperature display check box
In the Temperature display check box, set whether to display the temperature in the file output by the form output button. The temperature can be entered in the data correction dialog box.
□ Remarks display check box
Remarks In the Show check box, set whether to display the air temperature in the file output with the form output button. The remarks can be entered in the data correction dialog box.
□ Headline tag name check box
In the heading tag name check box, set whether to display the tag name in the heading of the file output by the form output button.
□ Headline display name check box
In the Headline display name check box, set whether to display the display name in the headline of the file output by the form output button.
□ Heading unit output check box
In the heading unit output check box, set whether to display the unit in the heading of the file output by the form output button.
■ Output File Setting
□ Fixed name input area
In the fixed name input area, set the file name of the output file.
□ Date and time display additional position radio button
Date and time display additional position radio button sets the position to add the date and time set in the date and time format setting input area to the fixed name.
□ Date and time format setting input area
The Datetime Formatting area formats the dates to be added to the output file. The format of the format is as follows.
| Format and example | Output result |
|---|---|
| y | 1 or 2 digits of the year (0 to 99) |
| yy | Last 2 digits of the year (00 to 99) |
| yyyy | Last 4 digits of the year |
| M | Month (1 to 12) |
| MM | Month (01-12) |
| d | Date (1 to 31) |
| dd | Date (01-31) |
| ddd | Abbreviated day name (Sun, Sun) |
| dddd | Name of the day (Sunday, Sunday) |
| yyyy MM MM dd day (ddd) | Monday, January 29, 2018 |
■ ExcelSetting
□ Stationery Excel file setting combo box
You can set the Excel file template for form output.
□ Sheet name setting combo box
You can select an Excel file sheet for form output.
□ Data output start cell setting area
You can set the cell to start the data output.
■ Data correction setting dialog box
In the Data Correction Settings dialog box, you can correct the daily report data.
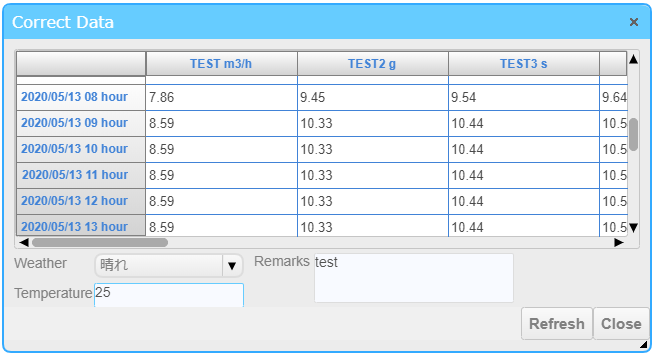
□ Form data display area
In the form data display area, values for one month from the date and time set in the start date and time setting area are displayed. You can enter data by selecting a table cell in this form data display area.
□ Weather combo box
The weather combo box allows you to specify the weather to be displayed in the output file if the weather display check box is true.
□ Temperature input area
In the Temperature Input Area, if the Temperature Display check box is true, you can specify the temperature to be displayed in the output file.
□ Remarks input area
In the remarks input area, when the remarks check box is true, you can specify the weather to be displayed in the output file.
Pressing the Update button will modify the device data if you have the permision to the device. If you do not have the permission, you cannot modify the data.