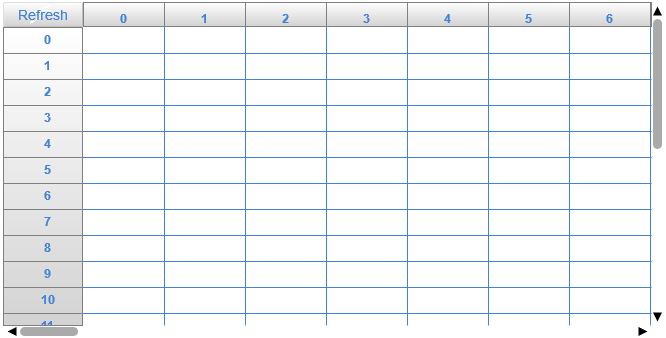
Table
■ Control appearance
■ Description
This control is used to display data in table format.
Addition to edit the value directly on the cell, you can import data from a CSV file.
Addition to edit the value directly on the cell, you can import data from a database table or a CSV file.
The format of the CSV file has the following rules.
| Rule type | Rule contents |
|---|---|
| Delimiter |
Column delimiter : Comma(,) Line delimiter : New line characters(\r\n, or \n) |
| File encoding | UTF-8 |
| Maximum read lines | 500 |
| Maximum read columns | 100 |
■ Events
This control has no available event.
■ Properties
Here is the list of the properties of this control.
For the common properties, please refer to common items page.
| Property name | Default Value | Description |
|---|---|---|
| File | - | To set the URL of the CSV file that the table will display the content of the file. |
■ Functions
The list of available functions.
In Javascript Area, you can enter this + ".FUNCTION" to use the function.
For the common functions, please refer to common items page.
| Function Name | Argument | Return Value | Description |
|---|---|---|---|
| setFile / setUrl | url | - | To set the URL of the CSV file that the table will display the content of the file. |
| getFile / getUrl | - | Value | Get the URL of the CSV file. |
| setRowCol | row, column, data | - | Set the data to the specified row, column. |
| getRowCol | row, column | data | Get the data of the specified row, column. |
■ Advanced Settings
Advanced settings can set the detailed settings of the table.
■ General
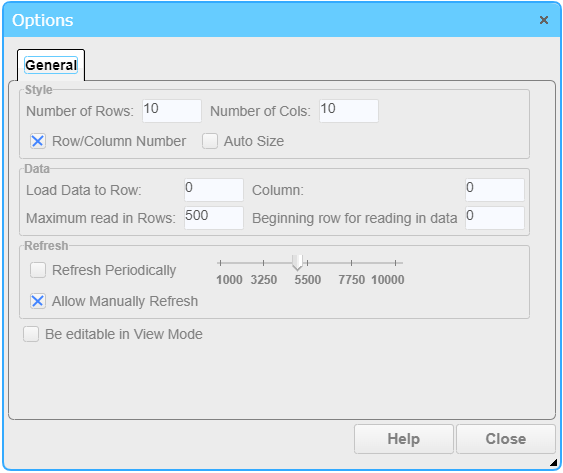
On the General tab, you can set the basic style of the table, and the settings of how to read the CSV file.
On the General tab, you can set the basic style of the table, and the settings of how to read the CSV file.
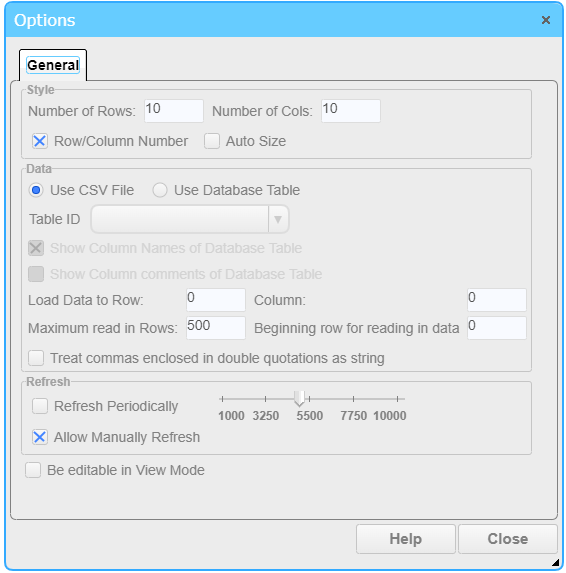
On the General tab, you can set the basic style of the table, and the settings of how to read data from a CSV file or a database table.
□ Number of Rows
Set the maximum number of rows of the table. The default value is "10".
□ Number of Cols
Set the maximum number of columns of the table. The default value is "10".
□ Row / Column Number
If this option is checked, the table displays the row and column numbers at the top and left side of the table. The default is true.
□ Auto Size
If this option is checked, the cell will be adjusted to the optimal size automatically. The default is true.
□ Use CSV File
If enabled, specify the CSV file in the "File" property and the read CSV data will be displayed in the table.
□ Use Database Table
If enabled, displays a record of the database table specified by the Table ID. The records are displayed in the order of the ID columns. The database table ID is set in .
□ Table ID
Set the ID of the form to be read.
□ Display the name of the column of the database table
If enabled, the column name of the table is displayed at the beginning of the read.
□ Show Column comments of Database Table
If this option is enabled, the comments of the database column will be displayed at the first row of the read in position.
For how to set the comments, please refer to Edit Table Construct.
Set the comments like "jp:XXX,en:XXX,zh:XXX" format, you can set comments for multiple languages. In the format, "en" is English, "jp" is Japanese, "zh" is Chinese.
□ Load Data to Row / Column
Set the location in the table where the read value is displayed from. The default is row "0" and column "0".
□ Maximum read in Rows
Set the maximum number of rows to read. The default is "500".
□ Beginning row for reading in data
Set the beginning row for reading in data. The default is "0".
□ Treat commas enclosed in double quotations as string
When enabled, data read from CSV file, commas enclosed in double quotes will be treated as strings instead of separators.
□ Refresh Periodically
If this option is checked, the table will load the CSV file by the specified period.
□ Allow manual refresh
If this option is checked, you can refresh the content of the table by the refresh button at the left-top corner of the table.
□ Be editable in View Mode
If enabled, you can edit the contents of the table in Run mode. The default value is invalid.
The background color of the data obtained from the database table is displayed in pink when it is being edited.
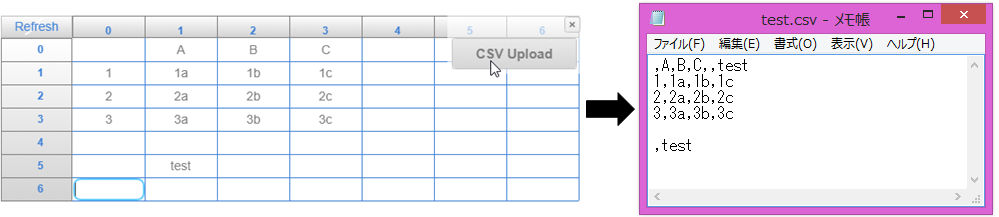
□ Enable Upload Function
If enabled, the upload button will appear on the other side of the selected cell when the cell is in edit mode. Click this upload button to upload the modified data.
When using CSV, the "CSV Upload" button is displayed. When using a database table, the "DB Update" button is displayed.
When the "Refresh Periodically" is enabled, the periodically refresh is stopped when "DB Update" or "CSV Upload" button is displayed.
□ "CSV Upload" button
Press this button to upload the contents of the current table to the CSV file set in the File property.
Please note the following when uploading CSV
The contents of the rows and columns whose row and coloum number is less than the read position will not be uploaded.
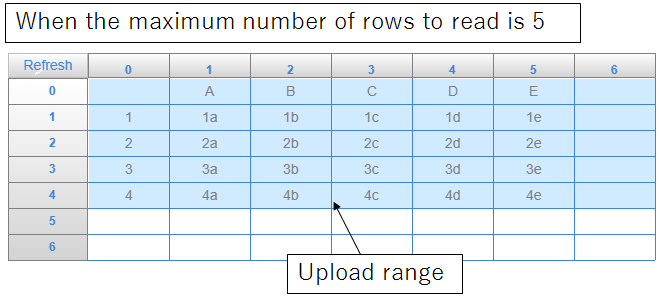
Changed data in the rows whose row number is larger than the maximum number of read rows will not be uploaded.
Blank lines or columns with no values, does not filled with commas.
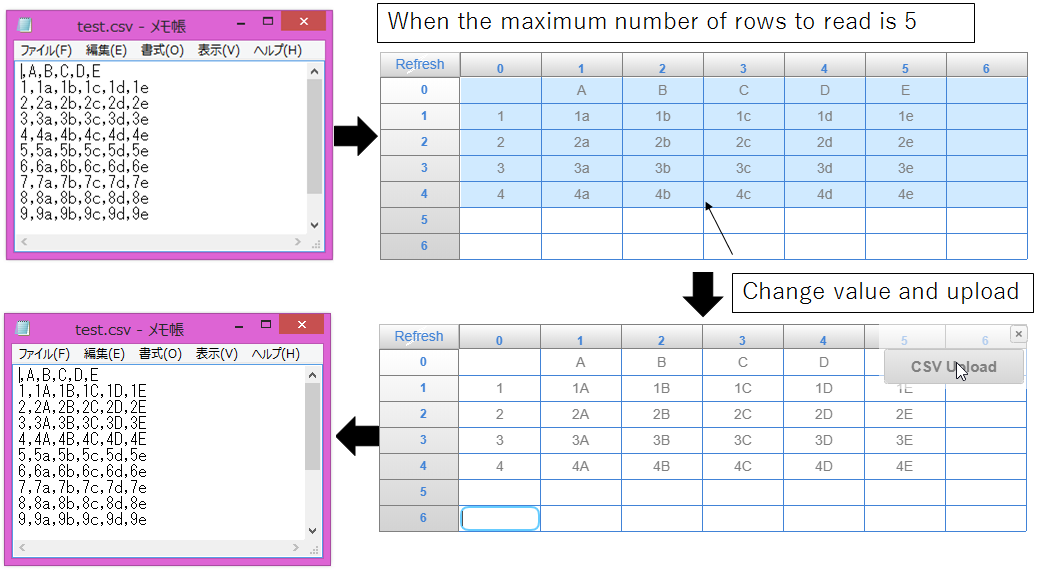
Data in the original CSV file that over the maximum loaded rows will be kept no change when data is uploadedto the CSV file.
□ "DB Update" button
Press this button to update the current table contents to the table of the database specified by the Table ID. There are three update steps.
□ Update
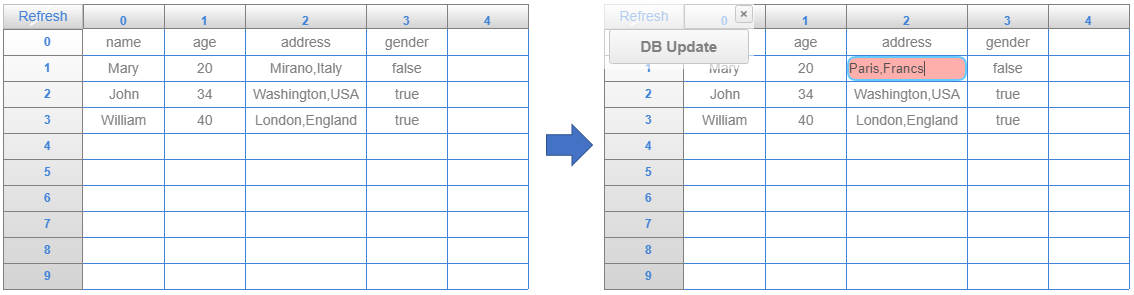
Modify the data displayed in the table and press the "DB Update" button to update the record.
□ Add
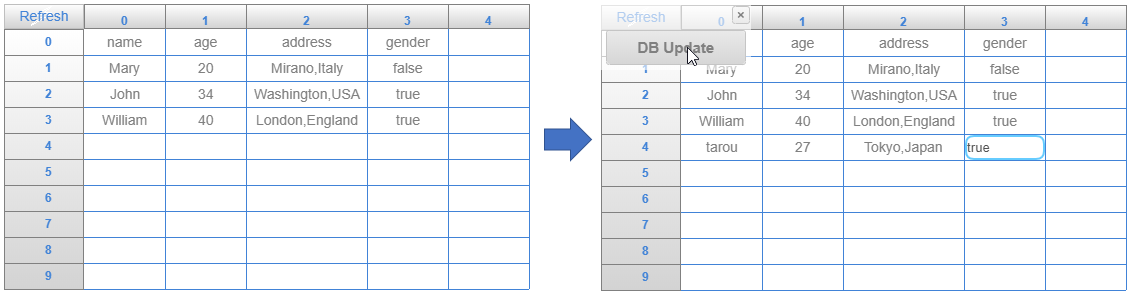
Enter the contents of the record you want to add below the line read from the database table, and then click the Update Database Table button to add a new record to the table.
□ Delete
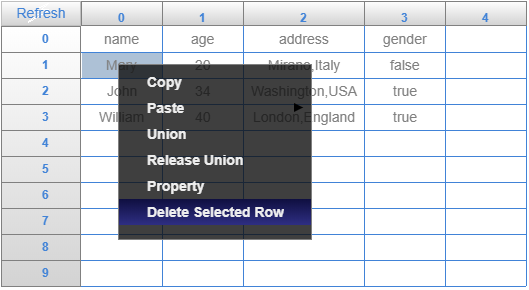
To delete the displayed record, right-click on the data you want to delete and select "Delete Selected Rows" from the menu.
□ Load Data to Row / Column
Set the location in the table where the read value is displayed from. The default is row "0" and column "0".
□ Maximum read in Rows
Set the maximum number of rows to read. The default is "500".
□ Beginning row for reading in data
Set the beginning row for reading in data. The default is "0".
□ Refresh Periodically
If enabled, the data will be read periodically and the display will be refreshed. The default value is invalid. The unit is milliseconds.
□ Allow Manually Refresh
If enabled, an update button will appear in the top left corner of the table. Load data when the button is pressed. The default is valid.
□ Be editable in View Mode
If enabled, you can edit the contents of the table in Run mode. The default value is invalid.
□ CSV read location, line
Set the starting line of the table when importing the CSV file. The default is "0".
□ Load Data to Row / Column
Set the location in the table where the read value is displayed from. The default is row "0" and column "0".
□ Maximum read in Rows
Set the maximum number of rows to read. The default is "500".
□ Beginning row for reading in data
Set the beginning row for reading in data. The default is "0".
□ Refresh Periodically
If this option is checked, the table will load the CSV file by the specified period. The default value is invalid. The unit is milliseconds.
□ Allow manual refresh
If this option is checked, you can refresh the content of the table by the refresh button at the left-top corner of the table.
□ Be editable in View Mode
If enabled, you can edit the contents of the table in Run mode. The default value is false.
□ Enable Upload Function
If enabled, the upload button will appear on the other side of the selected cell when the cell is in edit mode. Click this button to upload the modified data.
When using a CSV file, the "CSV Upload" button is displayed.
When the "Refresh Periodically" is enabled, the periodically refresh is stopped when "CSV Upload" button is displayed.
□ "CSV Upload" button
Press this button to upload the contents of the current table to the CSV file set in the File property.
Please note the following when uploading CSV
The contents of the rows and columns whose row and coloum number is less than the read position will not be uploaded.
Changed data in the rows whose row number is larger than the maximum number of read rows will not be uploaded.
Blank lines or columns with no values, does not filled with commas.
Data in the original CSV file that over the maximum loaded rows will be kept no change when data is uploadedto the CSV file.
■ Cell Settings
This dialogbox is used to setup the format of selected cells.
To show this dialogbox, you can select the cells in the table by click and move the mouse left button, then click the right-button of the mouse, when the context menu shows, select the "Property" menu.
■ String
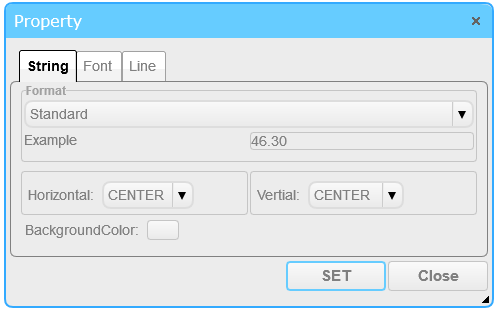
In "String" tab, you can set the format of the string in the cell.
This setting does not affect the actual value of the string, just change the display format.
In the "Example", you can confirm the result string displayed in the talbe.
■ Standard
For standard setting, display the value by the original raw format. This is the default setting.
■ Integer
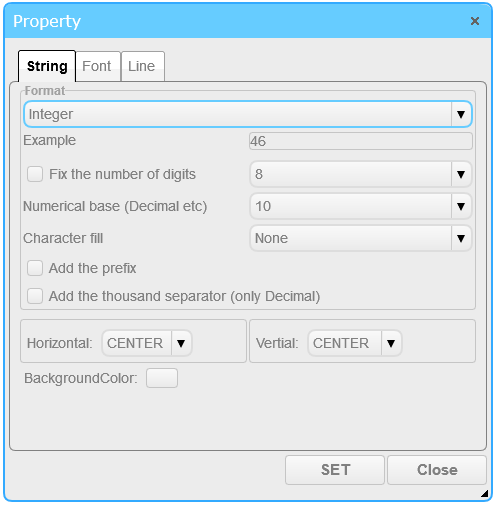
When "integer" is selected, the value of cell is displayed as a integer in the specified format.
□ Fix the number of digits
If this option is checked, display the integer by fixed number of digits. Number of digits can be selected from within 2-32.
□ Numerical base (Decimal etc)
Select the numerical base of the display format. You can choose from 2,8,10,16.
□ Character Fill
Select the fill character when the length of the digits is less than the "Fix the number of digits".
□ Add the prefix
If this option is checked, the prefix is added to the display string according to "Numerical base".
'0x' is added to heximal string; '0b'is added to binary string; '0o' is added to Octal stirng
□ Add the thousands separator (only Decimal)
If this option is checked, every three digits are separated by comma.
■ Float
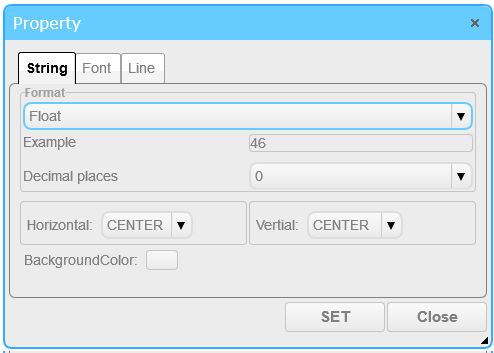
When setting "floating point" format, the value of the Text property is displayed in the form designated by the floating-point number.
□ Decimal places
Set the number of the digits of the decimal part of the float data.
■ Date Time

When "Date Time" is selected, the value the cell will be displayed as the date-time format.
The value of the cell must be the string in "2016/01/01 12:34:56", or a number of milliseconds from 1970/01/01 00:00:00 (UTC). The value is converted to time value and displayed by the specified format.
In addition, if the value is empty, the table will use the current time to display the cell.
□ Date Format
Specify the format of the date-time string.
□ Horizontal Alignment(H)
Specify the horizontal alignment of the string in the cell.
□ Vertical Alignment (V)
Specify the vertical alignment of the string in the cell.
□ Background Color
Set the background color of the string.
■ Statistics
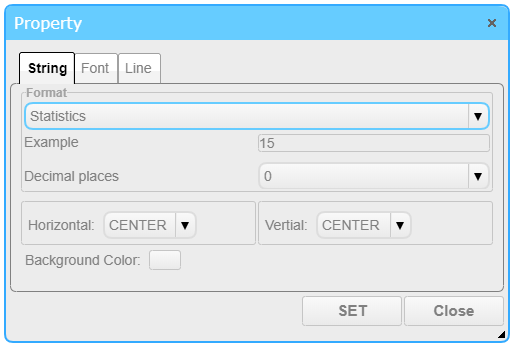
In the "Statistics" setting, if the input value is a specific value, the result of calculation such as summation or average is displayed.
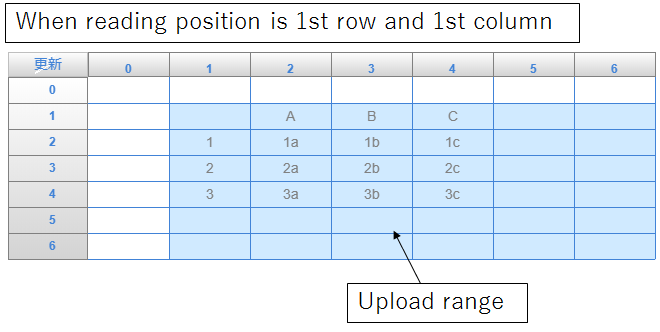
For the value, enter the calculation type and the range of cells to be calculated in the form of "calculation type ((cell 1 row: cell 1 column): (cell 2 row: cell 2 column))".
Character strings that can be used for calculation types are SUM, AVE, MAX, and MIN, and output the total, average, maximum, and minimum values, respectively.
Cell 1 specifies the upper left cell of the range to be calculated, and cell 2 specifies the lower right cell.
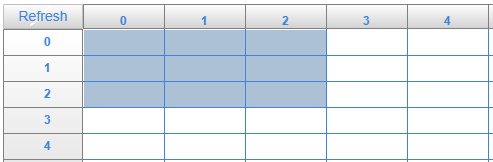
If you enter a cell value, such as SUM ((0:0):(2:2)), the range used for the calculation is as follows.
□ Decimal places
Set the number of the digits of the decimal part of the float data.
■ Font
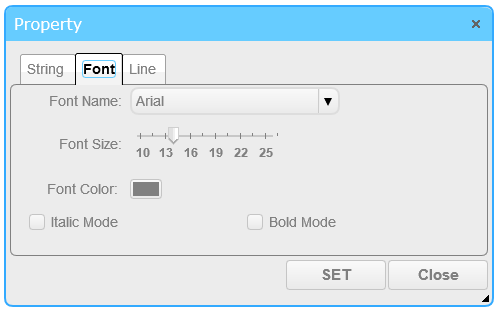
In the "Font" tab, you can set the font style of the cells.
□ Font Name
Set the font name.
□ font size
Set the font size.
□ font color
Set the font color.
□ Italic
Set the font italic style.
□ Bold
Set the font bold style.
■ Line
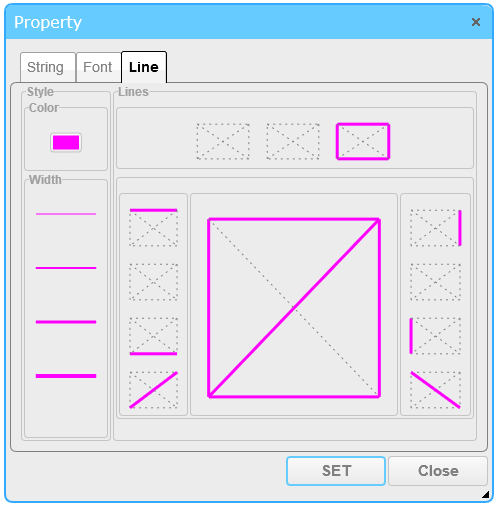
In the "Line" tab, you can set the table border line.
□ Color
Set the color of the border line.
□ Width
Set the width of the border line.
□ Line
Set or clear the border line of the cells.
You can click the style buttons to set or clear the border line.