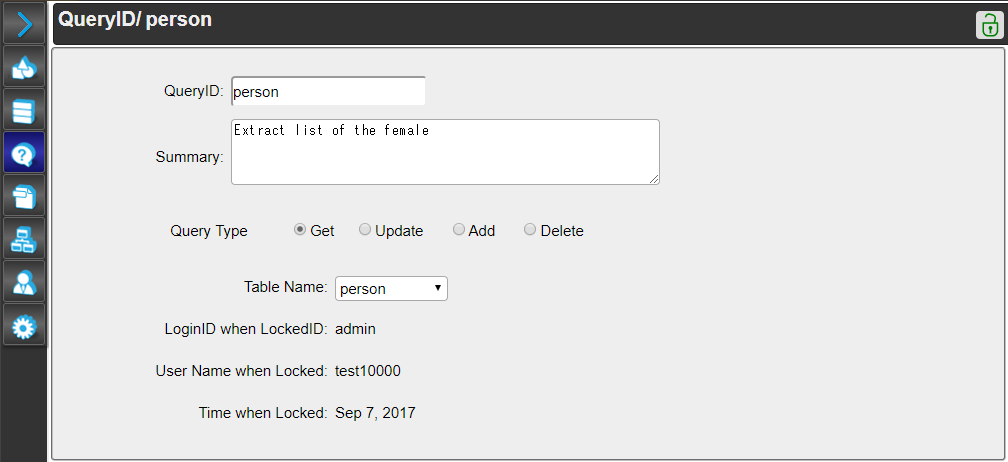
Basic Information of the Query
"Query" allows you to create and save queries used by HMI.
The query describes the processing to be performed for a table on a database.
On this screen, you can create a new query and also edit the created ones.
Contents
Query ID Summary Query Type Table Name Lock Function
Get Update Add Delete Generated SQL Command Example of creating query
Operate the Edit Screen

Query ID
You can change the query ID that to be saved.
The letters that can be used are strings with lowercase alphabet letters and numeric numbers.
Do not create queries with the same ID name as other saved queries.
Summary
This describes the summary of the created query.
Query Type
This sets the type of the query to be created.
This sets the type of the query to be created. This sets the type of the query to be created.
"Get" is to get or search a record that meets the condition from the records (data) saved in the table.
"Update" is to change the value of the record that matches the condition from among the records stored in the table.
"Add" is to add a new record into the table.
"Delete" is to delete the records that match the condition from the records stored in the table.
"Delete" is to delete the records that match the condition from the records stored in the table.
Query Database
Select the database to be operated by the query.
Select "Internal Database" to connect to the database defined in the CONPROSYS HMI System (CHS).
Select "External Database" to connect to the database (PostgreSQL or MySQL) in the server that is not CONPROSYS HMI System (CHS).
See Connecting to an external database for details.
Table Name
Set the table name to run the query.
The list of table names that can be selected here is created in "Table".
Lock Function
Click the button to lock the query you set.
Also You can unlock by clicking the button.
New Query
Finish selecting "table name" to create and save queries.
The procedure to create a query differs depending on the selected "query type".
The following describes how to set per query type.
Get
Condition settigWhen "Get" is selected, three areas of "Output Data", "Condition", " Advanced" are displayed.
Set a column name you want for "Column Name" in "Output Data", and an aggregate function for "Function".
"Key field" sets the key field to be used in HMI.
Click the "Add" and "Add All Columns" buttons located below to set the column you want to output.
If you use the aggregate function to get several values, group on columns that do not use the aggregate function in "Advanced” below.
「"Condition" sets the condition of the value to be acquired. For details, refer to Condition settig below.
Click the "Add" button located below to add the conditional expression.
"Advanced" is for setting duplication, sorting, and grouping of acquired data.
If you want to skip data duplication, check off "No Duplication"
If there are several values to be acquired, it is recommended to set "Sorting". (The orders of the query results may differ each time the execution is performed if you do not set this)
Do not set the same column names in "Output data", "Sorting", and "Grouping".
Update
When "Update" is selected, two areas of "Condition" and "Write Data" are displayed.
In "Condition", set the condition of data to be updated. For details, refer to Condition settig below.
Click the "Add" button located below to add the conditional expression.
"Writ Data" allows you to set the data to be updated.
The device value and HMI variable can be used by setting the variable to the value that to be updated.
Click the "Add" and "Add All Columns" buttons below to add columns you want to update.
Do not set the same column names in "Write Data".
Add
When "Add" is selected, the "Write Data" area is displayed.
In "Write data", set the data to be added.
For the column that is not set in "Write Data", the default value set in the table will be inserted.
Click the "Add" and "Add All Columns" buttons below to add columns.
Do not set the same column names in "Write Data".
Delete
When "Delete" is selected, the "Condition" area is displayed.
Set the conditions of data to delete in "Condition". For details, refer to Condition setting below.
Click the "Add" button located below to add the conditional expression.
Generated SQL Command
Click "Generated SQL Command" to display the query (SQL statement), which is following the postgresql grammar, in the setting of the editing screen.
Use this function to check the created query.
It also performs simple error checking.
Examples of Creating Query
Example 1): To obtain the values of column b and column c that are the largest of the records in the column name a (hereafter, column a) among all the record.(Three columns of table are a, b, c)
Click "Add" In "Output data", and add column a, column b, column c. Next, select "MAX" in "Function" of column a.
This example requires no condition.
In "Advanced", add column b, column c into "Group By" to get the values of column b and column c.
Finally, click "Generated SQL Command" and confirm the displayed SQL statement is correct, then click the save button to complete the query creation.
The result to be displayed
An example: select max(a) , b , c from dbo.example_table1 group by b, c;
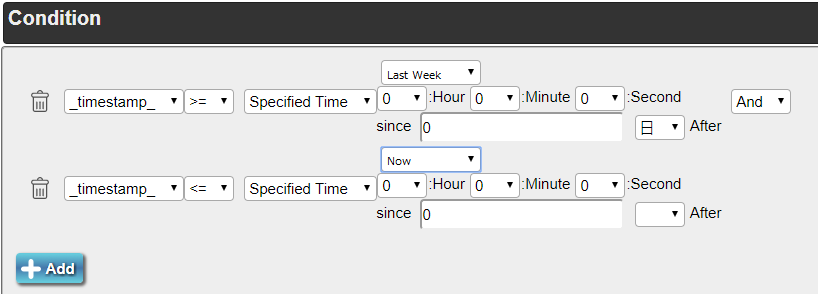
Example 2):Of all the records in the table, update the values of _timestamp_ in column b from one week ago up to today to 0.
Select "Update" in Query Type radio buttons.
See "Condition" shown below for an example 2.
The two columns displays "the value of _timestamp_ from one week ago to today".
In "Write Data", add Column b to set "Update column b to 0". Enter 0 to "Fixed value" input data.
Finally, click "Generated SQL Command" and confirm the displayed SQL statement is correct, then click the save button to complete the query creation.
The result to be displayed
An example:update dbo.example_table set _timestamp_ = default , b = '0' where _timestamp_ >= date_trunc('day', current_timestamp) - cast('1 week' AS INTERVAL) and _timestamp_ <= date_trunc('day', current_timestamp) + CAST('12 hours' AS INTERVAL);
Please note that "_timestamp_ = default" is added to the SQL statement if _timestamp_ is not specified for "Write Data" upon updating.
(For details about the column names "_id _" and "_ timestamp _", see the About the table to be created.)
Example 3): Add "VALUE" of value in the column a, and the variable "dt: dID.cID: tName" of value in the column b into the table.
Select "Add" in Query Type radio buttons.
In "Write Data", click "Add Column" to add column a, column b, into "Output Data".
Next, set the value of added column a to value "fixed value", VALU to input data, the value of column to “Variable” and select "dt: dID.cID: tName" for input data.
Finally, click "Generated SQL Command" and confirm the displayed SQL statement is correct, then click the save button to complete the query creation.
The result to be displayed
An example:insert into dbo.example_table ( a , b ) values ( "VALUE" , dt:dID.cID:tName );
For the column for which no value is specified, the default value of its column will be set. The default value is the value set in Edit Table Construct.
Example 4): Among the records whose value of column a is "VALUE" in the table and delete a record whose value of column b is 0 or NULL.
Select "Delete" in Query Type radio buttons.
See "Condition" shown below for an example 4.
Be certain when selecting "OR" and "AND" in the box on the right side.
Finally, click "Generated SQL Command" and confirm the displayed SQL statement is correct, then click the save button to complete the query creation.
The result to be displayed
An example:delete from dbo.example_table where a = 'VALUE' and b = '0' or a = 'VALUE' and b isNULL;

